Based upon our experience working with thousands of crowdfunding campaigns on Kickstarter and/or Indiegogo, here are some basic tips for configuring Google Analytics to analyze the performance of your crowdfunding marketing…
If you want to multiply pledges to your crowdfunding campaign, then crowdfunding marketing is a powerful tool, but not if you promote your project blindly. Budgeting money based upon mere speculation is reckless, and it can be terribly wasteful—plus, it’s entirely needless as long as you have excellent tools available to measure the performance of your marketing efforts.
One of the most powerful tools currently available for analyzing digital marketing is Google Analytics. And, thankfully, both Kickstarter and Indiegogo allow campaigners to use Google Analytics for their respective campaign pages. We’ll spend this blog entry detailing how to set up a Google Analytics account for a crowdfunding campaign, and we’ll spend our next blog entry explaining how to use it effectively in crowdfunding marketing.
Other powerful tools include Facebook pixels. These are used exclusively for Facebook advertisements, which we’ve found are usually the most effective (although costly) way to raise pledges for crowdfunding campaigns. Facebook pixels enable Facebook ad accounts to monitor what their ad-clickers do beyond Facebook, and these pixels can even generate retargeting audiences, along with powerful lookalike audiences of visitors and/or pledgers. Indiegogo allows campaigners to use Facebook pixels, gladly, but Kickstarter does not, sadly—and, although Kickstarter provides its own backend analytics, they’re rather rudimentary compared with either Facebook pixels or Google Analytics. But, for Kickstarter campaigners, Google Analytics can compensate for absent Facebook pixels by providing much of their same performance data (and more) in a different form, which is another reason to employ Google Analytics for crowdfunding campaigns.
In order to use Google Analytics, you’ll need a free Google account—and, if you don’t already have a Google account for your business, then you can create one anytime at account.google.com/signup. It’s important to note that each Google account is associated with at least one e-mailing address, which may (or may not) be a Gmail address. Having a Google account will not automatically create a Google Analytics account, as these are two separate accounts—but, while you’re logged into the appropriate Google account for your business, you can create a Google Analytics account anytime by visiting analytics.google.com. If you haven’t already set up Google Analytics to analyze activity on your business website, then you should probably complete this task first, and then create a separate Google Analytics property afterward for each crowdfunding campaign page. We’ll explain how to create new Google Analytics accounts next.
When creating a new Google Analytics account, you’ll need to name the new Google Analytics account (probably with your business name) and then specify the name of your website, its URL, your industry category (which is optional), and your time zone. If Google Analytics refuses to accept your URL, then it may be because you’ve entered a URL that starts with an http:// or an https:// and/or that ends with some tracking parameters (i.e. a question mark followed by some additional text)—if so, then you’ll need to remove those extraneous characters and then try again. In our experience, by the way, it rarely matters which URL you give Google Analytics—instead, what matters most is adding the correct Google Analytics tracking ID to your website, which we’ll discuss in another subsection below.
In any case, anytime you’ve successfully created a new Google Analytics account from your Google account, your Google account will automatically enjoy full authority over (and access to) that newly-created Google Analytics account indefinitely, unless/until you decide to revoke such authority—but, before you ever do that, you should grant at least one other person full authority over it. You can grant such authority (among other tasks) through your Google Analytics Admin panel, which we’ll overview next.
You may visit your Google Analytics Admin panel anytime by visiting analytics.google.com and then clicking the little cogwheel at your screen’s lower-left corner. This panel allows you to change Google Analytics settings and/or view Google Analytics data, as well as to enable other Google accounts to do likewise. The Google Analytics Admin panel includes three columns that are important to understand, which we’ll now examine one-by-one.
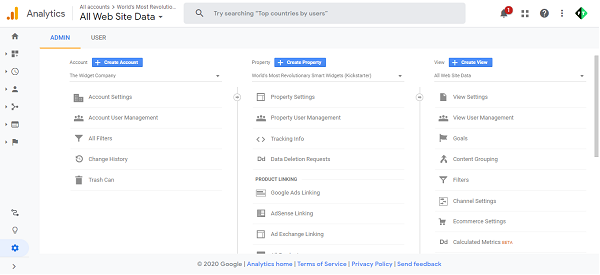
Your Google Analytics Admin panel’s left column shows the Google Analytics account that you’ve currently selected. You can use its pulldown menu to select other Google Analytics accounts that your Google account can currently access. A single Google account can enjoy access to as many as 100 Google Analytics accounts simultaneously (although businesses like ours can appeal to raise that limit); however, most businesses need only one Google Analytics account.
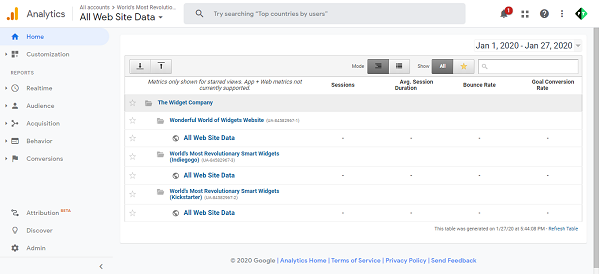
Your Google Analytics Admin panel’s middle column shows the Google Analytics property that you’ve currently selected. You can use its pulldown menu to select other properties within the Google Analytics account that you’ve currently selected in the left column. Each Google Analytics account can include as many as 50 properties (each with its own unique tracking ID), and it’s generally best to use a different property for each spot that you occupy in cyberspace—so, you can perhaps create a first property for your company’s main website, a second property for your Kickstarter page, a third property for your Indiegogo InDemand page, et cetera. If you haven’t already created an additional property for your campaign page, then this may be a good moment to do so by clicking the blue “Create Property” button and then entering the appropriate information. For crowdfunding campaign pages, please ensure that you're creating a traditional UA property, rather than a new GA-4 property.
Your Google Analytics Admin panel’s right column shows the Google Analytics view that you’ve currently selected. You can use its pulldown menu to select other views within the Google Analytics property that you’ve currently selected in the middle column. Each property can maintain up to 25 views of the data that it collects. Google Analytics will automatically create a single default view for each new property (which you normally shouldn’t alter significantly), but you can create additional views as desired. Some campaigners may want to keep their default view set to display data in their own time-zone and currency, while maintaining separate views for hired agents, one of which may display data in the currency that their crowdfunding platform is using (if it’s different from their own). For example, for each of our clients, we like to create our own personal view of their Google Analytics data, which we then set for both U. S. Pacific Time and U. S. dollars so that it’ll correlate well with our Facebook Ads data in calculating profitability.
So, altogether, your Google account maintains access to a simple hierarchy of multiple Google Analytics accounts (usually one for each business), each with multiple properties (usually one for each website), each with multiple views (usually one for each time-zone and/or currency). At each level of this hierarchy, your Google account can enable other Google accounts to view data and/or edit settings. We’ll now review some default settings that you probably want to adjust for your crowdfunding campaign.
You might want to enable other Google accounts to view your Google Analytics data and/or change your Google Analytics settings. You can do this in your Google Analytics Admin panel in each column through its respective option that reads “User Management.” For example, through “Account User Management” (in the left column), you can enable other Google accounts to enjoy authority over your entire Google Analytics account; and, through “View User Management” (in the right column), you can restrict such authority to the single view that you’ve selected. After you’ve selected the appropriate column’s “User Management” option, you can then click the blue plus sign toward the upper-right corner to add a new user to that account or property or view. Users are identified using the e-mailing address associated with their respective Google accounts; for example, we have a Google account for [email protected], and we use that account to examine our clients’ Google Analytics data. If you enable another Google account to “edit” your Google Analytics property for your crowdfunding campaign page, then that other account can perform the rest of the tasks that we’re about to list.
Google Analytics is most useful when its data-collecting features are fully activated. This includes knowing your backers’ characteristics—their genders, ages, locations, interests, et cetera. You can enable a Google Analytics property to start collecting demographic data by visiting your Google Analytics Admin panel’s middle column, then clicking Tracking Info > Data Collection, and lastly enabling Google Signals. It also helps to track data about your pledges. You can enable a Google Analytics view to start collecting transaction data by visiting your Google Analytics Admin panel’s right column, then clicking Ecommerce Settings, and lastly enabling e-commerce to be tracked—but only the basic e-commerce settings for crowdfunding platforms, because they’re not designed to use the “enhanced” e-commerce settings. After enabling each view’s e-commerce settings, you should also check its View Settings to ensure that they’re set for the appropriate currency. If this same Google Analytics property includes multiple views, then you should repeat this same two-step process for each view. One Google Analytics feature that you should never enable for any crowdfunding pages is User-ID, which will counterproductively prohibit Google Analytics from showing you any data whatsoever.
Google Analytics can also connect with Google Ads so that Google Ads can track its performance. We’ve found that Google Ads (whether Google search ads or GSN display ads or YouTube video ads) normally yields only supplemental pledges (at best) for our best campaigns, whereas Facebook ads are superior for crowdfunding marketing—but, while we’re testing Facebook ads for 3-10 days, we normally like to create Google Ads audiences and let them grow, just in case we decide to use them after a week or so. You can create such audiences by visiting your Google Analytics Admin panel’s middle column, then clicking Google Ads Linking, then linking the specific Google Ads account that you’d like to use, then returning to your Google Analytics Admin panel’s middle column, then clicking Audience Definitions > Audiences, and lastly creating some audiences. Google will require your first audience to be an All Users audience, after which you can create a transactions-based audience of everyone who has pledged, and maybe also a “Smart List” for more-profitable retargeting. You should render each of these newly-created audiences available to your linked Google Ads account. After creating audiences, you might also want to click Property Settings and then enable manual tagging, which will increase your flexibility in tracking your various Google Ads audiences. As for how to use Google Ads effectively in crowdfunding campaigns, we may (or may not) elaborate on this subject in a future blog entry.
After you’ve set up Google Analytics fully, it still won’t do anything unless/until you’ve added some HTML code to whatever webpages you want it to analyze. You can find this code by visiting your Google Analytics Admin panel, ensuring that the correct property (for your crowdfunding campaign page) is selected in its middle column, and then clicking Tracking Info > Tracking Code. Adding this code may look a bit daunting to some, but both Kickstarter and Indiegogo render it easy for you—all you need to do is to copy the simple tracking ID (which looks like something like UA-123456789-2), then paste that ID into the appropriate field in your campaign page editor, then save this change, and lastly let your platform automatically handle the rest of the coding process (instantly) for you. After this code has been added, anyone whose browser loads this page will have all of their activity on that page automatically reported to the specified Google Analytics property.
Please note that Kickstarter only allows primary campaign accounts to change Google Analytics tracking IDs, whereas Kickstarter will only pretend to change IDs for collaborator accounts. Also please note that, if you ever replace this ID with a different ID, then your data will stop being collected by the older property and will start being collected by the newer property—and that having it divided between two different properties can be rather inconvenient for some.
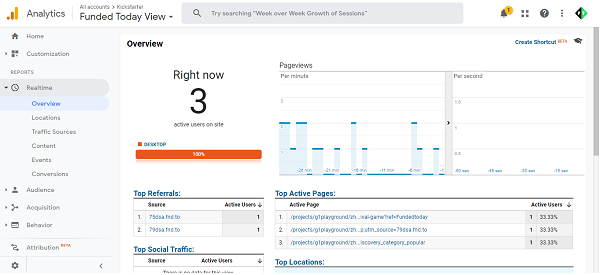
In any case, after you’ve added this tracking ID to your campaign page, you can visit (or refresh) your campaign page and then check Google Analytics to verify that it’s acknowledging your visit. For this purpose, rather than visiting your Google Analytics Admin panel again, you may instead click Realtime > Overview to see if Google Analytics shows any activity (and from where). By the way, we warn you in advance that viewing Google Analytics’ Realtime menu can become addictive for some campaigners! In any case, after Google Analytics begins to collect data, you can start to analyze it periodically, which is the subject of our next blog entry.
If it helps any, then you’re welcome to view this instructional video about how to set up Google Analytics for our use. Also, please study our next blog entry to learn how to use Google Analytics effectively in marketing your crowdfunding campaign!